Image credit: Capcom
Resident Evil Requiem features a sprawling Final Puzzle that spans multiple playthroughs. The puzzle involves severed hands, hourglasses, kicking plastic heads through rusty basketball hoops, and the distance between the Earth and the moon. There’s a lot to get into, and some rather clever people figured the whole thing out.
However, if you can’t be bothered with all that and just want a simple breakdown of what to do, you’ve come to the right place. Other guides may offer a detailed analysis of what each step means in this complicated puzzle – but this isn’t one of them. Here, we’re just going to tell you exactly how to solve the Final Puzzle in Resident Evil Requiem, and get those tasty 20,000 CP points that come with it.
Playthrough 1: Get the doll
So, we need to “Let the Sweet Pair hear the voice”, but to do that, we’re going to need two playthroughs of Resident Evil Requiem. In our first playthrough, we’ll focus on getting the doll, and do the rest of the puzzle in our second playthrough. Nice and easy.
This is because by the time you get the doll, the game doesn’t let you do the rest of the puzzle. Luckily, the doll will remain in your item box in future playthroughs. Also, this doesn’t need to be your first playthrough of the game; it just takes two to complete the puzzle. But feel free to start this on your second or third playthrough, if you like.
You can also make this your no-healing item or no blood run if you want, but this playthrough won’t be suitable for the speedrun challenge.
Step 1: Stand around
Play through the game until you get to the part in the Rhodes Hill basement where bodies are being dropped into a pool from a conveyor belt. Here, we need to let 150 bodies be processed, so enter the room, and you’ll hear Grace say, “Stay calm, Grace,” to herself.
Now walk over to the valve and don’t touch it. Instead, leave the game unpaused and go do something else for 15-20 minutes. That’s because we need to wait for 150 bodies to be processed. So go make a cup of tea, walk the dog, and come back in around 20 minutes.
Once you’re back, activate the valve and drain the water.
Step 2: Don’t kill any zombies
Once you drop into the pool, the trap will activate, and zombies will start getting ground up into mush. Your job is to survive, but this time you can’t kill any zombies with your weapons, or you’ll fail this part of the puzzle on this playthrough.
So, feel free to kneecap zombies so they’re stunned and fall into the gears, but don’t kill any yourself. To be safe, don’t shoot any zombie more than once, and only in the leg.
Step 2: Flush the toilet 8 times
Once you escape the basement, Grace will be back in Rhodes Hill with Emily. You can ignore the Severed Hand at this point, as you won’t need that until your second playthrough. Instead, run to the safe room and put Emily on the couch.
Now, head to the toilets where the cleaning lady zombie was headbutting the mirror. Go into one of the bathroom stalls and flush the toilet 8 times.
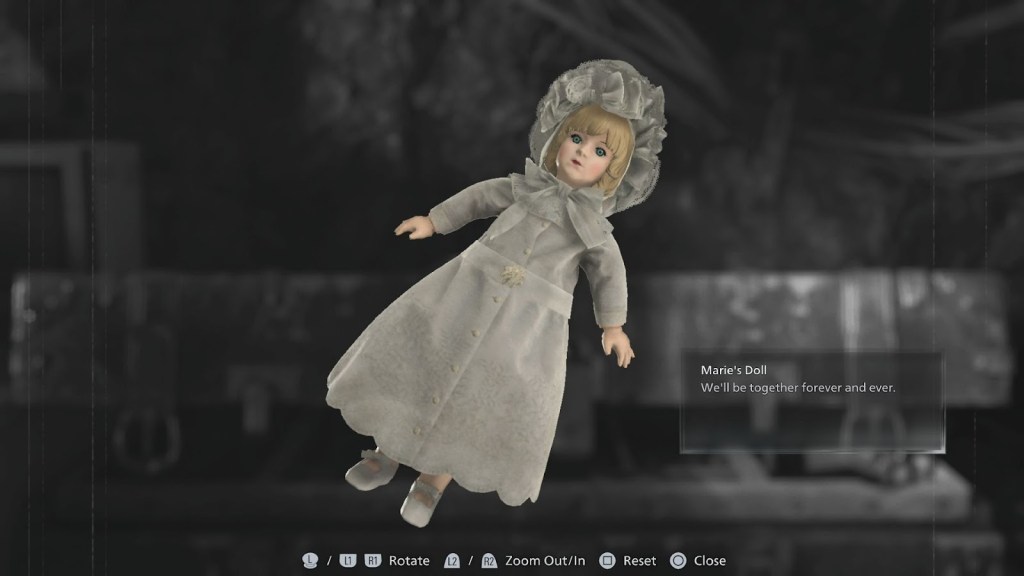
Step 3: Retrieve the doll
Now, keep playing through the game to the part where Grace is sent to retrieve the helicopter key. Once the self-destruct has been activated, get to the area where you need to blow zombies up with canisters and complete this section. Then, in the next area, you’ll see things start to blow up as some zombies resurrect as Blisterheads.
Ignore all of it and head to the bottom of the staircase. Here, the doll will be sitting in a pool of blood. Grab it and get out of there. That completes every step in your first playthrough. Now complete the game and start a new one on any difficulty. Again, no speed runs for this one.
Playthrough 2: Solve the puzzle with “The Sweet Pair”

On your second playthrough, you’ll notice that the doll is still in your item box. Leave it there until you complete the basement section again. But this time, pick up the Severed Hand when you escape the elevator. It’s time to finish the puzzle.
Step 4: Scan the Severed Hand
Now that you have the Severed Hand on your second playthrough, take it to the Blood Lab and analyze it in the scanner. You’ll need to complete another blood puzzle. This can be solved in 3 moves by activating the Middle, Left, and then Right nodes.
You’ll then see a screen labeled “Time to Play” with a code displayed. Ignore the code, as we’re going to just give you the solution, so you don’t need to do anything with it.
Step 5: Retrieve Emily and the doll
Nice and easy. Go back to the safe room, take the doll out of your item box, pick up Emily, and head to the office on the second floor, east side, where Gideon frightened Grace in a cutscene, and before Chunk came after you.
You’ll remember there was a Star, Sun, Moon puzzle box in here. Take Emily and the doll here.
Step 6: Let the Sweet Pair hear the voice
Now that you’ll have the Sweet Pair with you, it’s time to solve the Final Puzzle. Approach the puzzle box behind the desk and enter the following:
Sun, Sun, Star, Sun, Moon, Star, Sun, Moon, Sun, Moon, Star Moon
You’ll now hear a child giggle, and you should receive a notification telling you the Final Puzzle has been solved. You’ll also be 20,000 CP richer.
Now, of course, there’s a ton of other steps involved in this puzzle when it comes to working out that above code, but in this guide, we essentially allowed you to skip all that and get straight to the good stuff.
So congratulations, that’s how you solve the Final Puzzle in Resident Evil Requiem without any nonsense!
FAQs
Yes, because by the time you get the doll, it’s too late to go back into Rhodes Hill and do the next stage.
Yes, but these steps aren’t necessary if you already know the code on the final step. These are all clues to help you work out that code. This guide assumes you’d like us to simply tell you the solution.
It’s not advised, as a portion of this is spent standing around for 20 minutes of in-game time. Also, solving the puzzle in the second run also eats into your game time. Avoid speed runs for this puzzle. However, you can run other scenarios, such as no healing items or no use of blood devices.